
Marketing Cloud Campaign Management
Today you will learn how you can build an integrated Marketing Cloud campaign with almost no code, using only Smart Capture forms and Journey Builder. These amazing tools give you the ability to collect data easily and dynamically, as well as automate processes to scale your marketing actions and accurately assess the performance of your campaigns.
With Smart Capture, you can create simple lead capture forms directly from the platform, which you can then include on different landing pages. When the leads complete the form, their information will automatically be added, in this case, to a data extension that will later be used in a journey.
Use Case
Let's say that you want to send an invite to your clients for a special event, and you would like to know who's going to attend so that you can send them a confirmation, reminder, or other relevant information about your event.
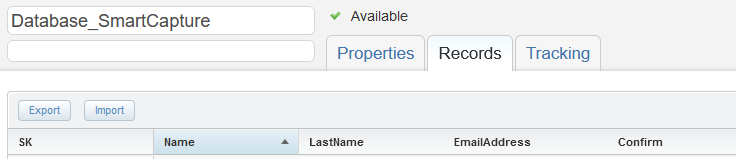
To implement this flow, you will first need to create a data extension with the contacts you want to invite to the event.
*Important: make sure to include a boolean field in your data extension to flag which contacts will attend the event later on.
This is how yourdata extension should look! 👇
Step 1 - Building the Email
You can build emails directly in:
- Email Studio > Content > Create > Email Message.
There are many different ways to build an email. You can create a HTML paste email, reuse existing templates in your account, or create one from scratch using one of the themed templates that Salesforce Marketing Cloud offers.
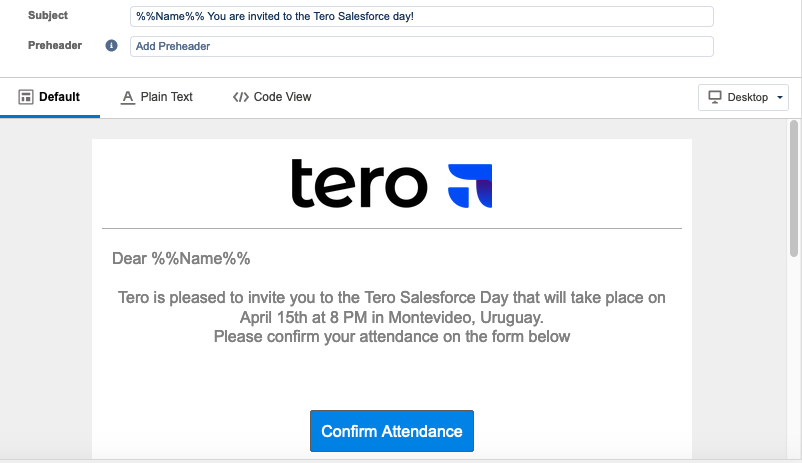
In this case we made a basic email and added an image block for Tero’s logo, a text block, and a button to redirect recipients to our landing page and Smart Capture form.
If you want to personalize your email you can use Personalization Strings.
With the Personalization Strings you can include Subscriber Attributes like the first name and last name in the subject, preheader, and body of the email.
You can also insert Personalization Strings using %% at the beginning and the end of the data extension column attribute.
In this case, we have included a column called Name that contains the name of the targeted subscribers on our data extension. So, in the subject email and body for the invite we will place %%Name%%.
Following the email, it’s important to include a button to redirect subscribers to the landing page that we will create in step 2. Stay tuned — this button will be very important later on!
Step 2 - Building the Landing Page
You can build landing pages directly from: Web Studio > Cloudpages > Create Collection
Collections work as Folders, in this case you are going to save your landing page and other landing pages relevant to this event here.
To create a collection:
Collection Name > Add Content > Landing Page
You can build the landing page pretty similar to the email that we built in Step 1, by simply dragging and dropping text or image blocks.
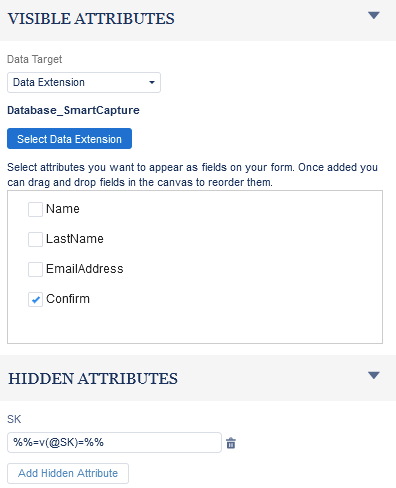
The most important thing to remember in this step is to add the Smart Capture form, once you drag and drop this block you will need to set up your initial data extension (the one that contains all the subscribers you want to reach) as the target data extension.

Smart Capture allows you to use data extension columns as the input fields on your form. In this case, we are only interested in knowing which subscribers want to confirm their attendance. With this in mind, you can use the Confirm boolean field in your form.
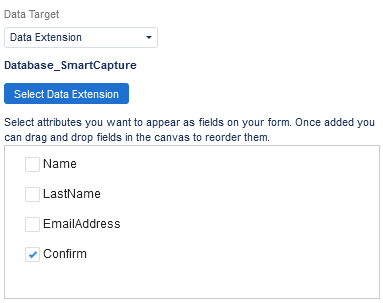
This is how it looks so far! This is the landing page that our target subscribers will open when they click the “Confirm Attendance” button on our email!

So, you are probably wondering, “But... How can we identify which subscribers will attend the event? How do we identify their Subscriber key if we are going to send a general email message?”
Well, in order to answer that question, we will need to follow some technical steps and implement some code.
But don’t panic! These are pretty simple steps and we are going to guide you every step of the way 🚀
Before we jump into the technical steps, let’s quickly recap all the processes that we want to create:
You need to send an email with an invite to an event to certain subscribers (you have all those subscribers already in a data extension).
In the email, we will include a button that redirects to a landing page with a form where your subscribers can confirm their attendance.
Now, let’s start with the technical steps!
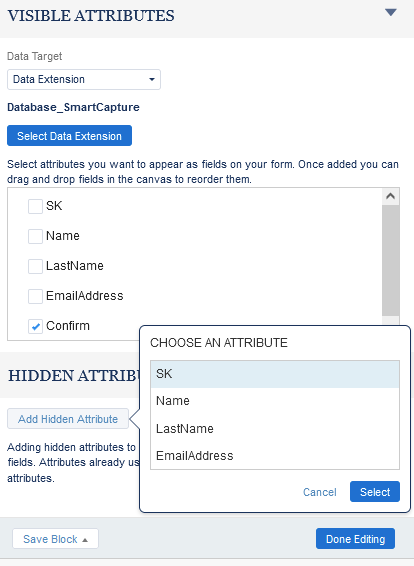
- First things first, on our landing page we need to mark as hidden the Subscriber Key Attribute, so that it is invisible to the subscriber.
We can mark an attribute as hidden directly in the Smart Capture form.
- We are then going to go back to the email that we previously created in Step 1 and edit the button that redirects to our landing page.
Why do we need to do this? When we send the email to our target subscribers from our data extension, we will need to identify the Subscriber Key of users who want to attend and ‘flag’ their confirmation with the boolean field.
In the email button, we are going to add some AMPscript in the box named ‘Link URL’ and add this parameter:
What is inside the parentheses is called Parameters.
a. The first Parameter will be the number of your Landing Page. You can find this number following these steps inside the collection.
b. The second parameter is a name for the attribute you want to reference. In our case we called it “SK” (subscriber key).
c. The third parameter (inside the brackets) is the exact name of the column that we are referencing in our data extension.
- We are going to go back to our landing page and drag and drop a code snippet block at the top.
In this code snippet, we are receiving the parameter that we sent with the email button.
- Finally, don’t forget that we set up the “SK” attribute on the Smart Capture form as hidden. The last step will be to set the parameter that we received from the email here.
This is how it will look!
And that’s it for the technical side! 🧐
Step 3 - Building the Journey
This will be the easiest step, because we only have to integrate all the pieces of the puzzle together in a Multi-Step Journey. 🧩
We will go to Journey Builder and select ‘Multi-Step Journey’ as our entry source and then use our initial data extension containing the subscribers we want to reach for this event.
For the activities of the Journey, we can design the flow as we wish! In our case, we designed something like this:
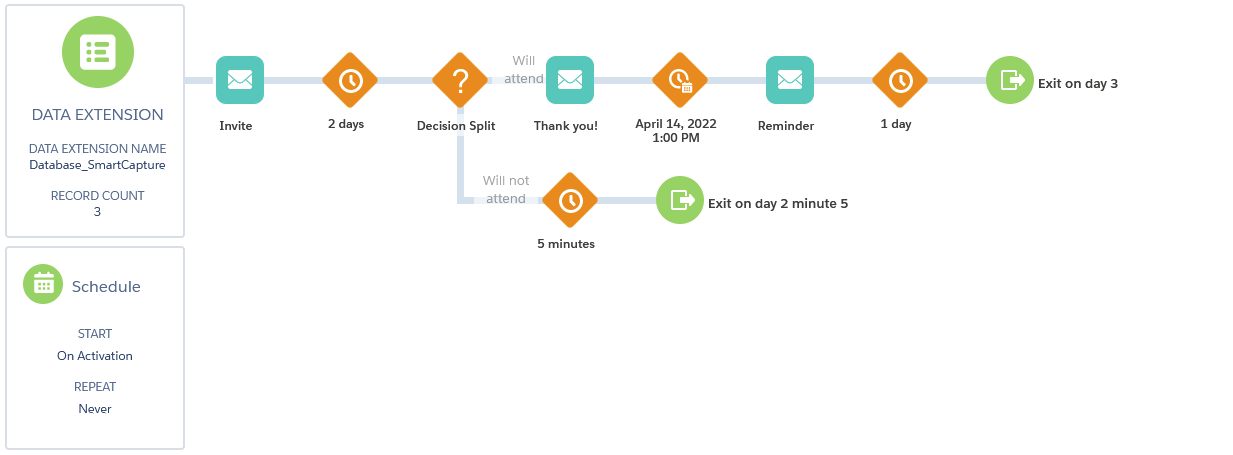
- We placed a first Email Activity that points out our invitation email, and a Wait Activity of 2 days to give people time to open and read the email.
- After the Wait Activity, we placed a Decision Split, to split two paths that distinguish between people who confirmed their attendance on the landing page and those who didn’t.
In order to achieve this, we must first add Filter Criteria to the first path of the decision split.
Important: When configuring the decision split, you are going to be asked to use Journey Data or Contact Data. In our case, we need to use Contact data because we need to “listen” in real time to see if the Boolean field “Confirm,” changed to true. This means the contact opted in to attend the event on the landing page.
To use Contact Data, we need to link our data extension in Contact Builder.
Once you link your data extension to Contact Builder, this is how your decision split configuration should look:

For the rest of the flow, we can design it however we want! In our case, we added a ‘Wait by Duration’, this means that recipients who RSVP’d will receive a reminder one day before the event.
And that’s it! We did it! 🎉
Conclusion
Congratulations on making it this far! You have comprehensively and strategically learned how to create an event campaign in Salesforce Marketing Cloud in a simple and intuitive way by following just three steps. Not only have we shown you one of many ways to create a campaign in Marketing Cloud, but we have also demonstrated how to integrate the platform, as well as the capabilities and native tools that it has to offer, such as emails and the landing pages. You can build a lot of cool stuff without needing to write a lot of code. 💪
You are now ready to level up and grow your team and company by implementing this technology.
References
Here are some helpful resources:
- Personalization Strings: https://help.salesforce.com/s/articleView?id=sf.mc_es_personalization_strings.htm&type=5
- Journey Data and Contact Data: https://help.salesforce.com/s/articleView?id=sf.mc_jb_journey_contact_data.htm&type=5
- Link Data Extensions in Contact Builder: https://help.salesforce.com/s/articleView?id=sf.mc_cab_link_data_extensions.htm&type=5


